Jailbreaking a Kindle 4
The Kindle series by Amazon has long been the target of hackers looking to run their own software on it. Being from Amazon, the devices themselves are pretty locked down, but the collective might of random people on the internet prevails so far. What this means for you is that you can, with some effort, install anything you want, including the latest version of KOreader, on a Kindle from 2011 (specifically the Kindle 4 non-touch, both grey and black variants).
The most active place for such hackers are the MobileRead Forums. Their attached wiki was also popular in the Kindle 4’s heyday, but has since been mostly abandoned, mostly because doing anything requires filling a CAPTCHA whose provider has disappeared. So instead of editing the wiki article, I decided to make my own guide, updated for 20261.
Install original firmware 4.1.3
Since the Kindle 4 has long been discontinued, its latest firmware from Amazon is just as hackable as any other version, so there’s no reason not to install it. Everyone else is running it too, so you’ll have a common base platform.
You can check what version your kindle is on in the footer of the settings screen.
Go to Amazon’s webpage for Kindle 4 firmware and download and install all the firmware updates you need.
To install a single firmware update, copy one .bin file to the Kindle’s root directory over USB, then open the menu, go to “Settings”, open the menu again, then select “Update Your Kindle”.
If it’s greyed out, you got an incompatible update file, you put it in the wrong directory, or you’re already on the target version (or newer).
ASIDE: You can use KindleTool to extract the .bin update packages. You’ll see that the all of them are incremental updates, so you can’t return back to a stock rootfs just by installing a firmware update.
Installing the Jailbreak
The jailbreak uses an exploit in the Kindle’s diagnostic mode to change the firmware and allow installing unsigned system update packages.
First go to NiLuJe’s big thread of downloads and download the “Kindle 4 JailBreak” (kindle-k4-jailbreak-1.8.N-r18977.tar.xz). From the archive copy data.tar.gz, ENABLE_DIAGS, and diagnostic_logs to the Kindle’s storage. Then restart the Kindle through the settings menu (holding the power button won’t work!).
When it restarts into diagnostics mode, delect “D) Exit, Reboot or Disable Diags”, then “R) Reboot System”, then press the left D-pad button. The jailbreak should now start installing.
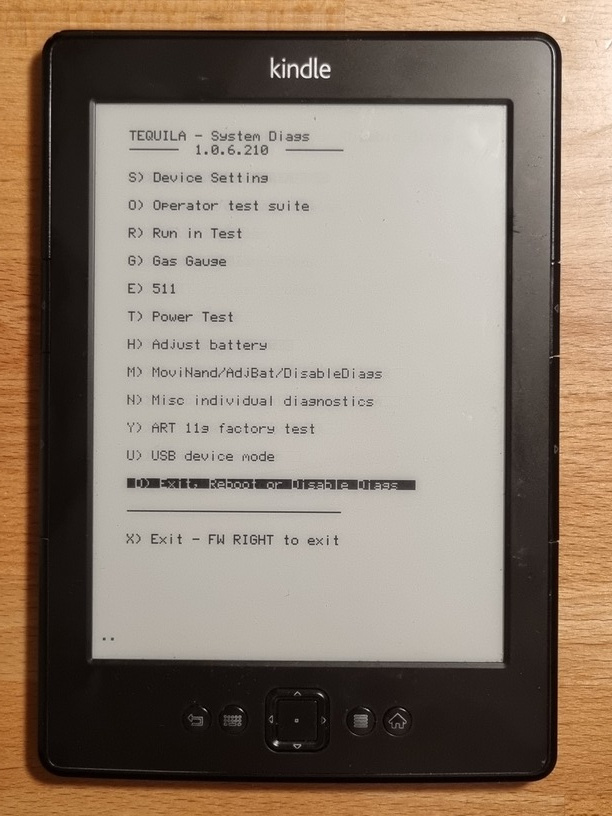
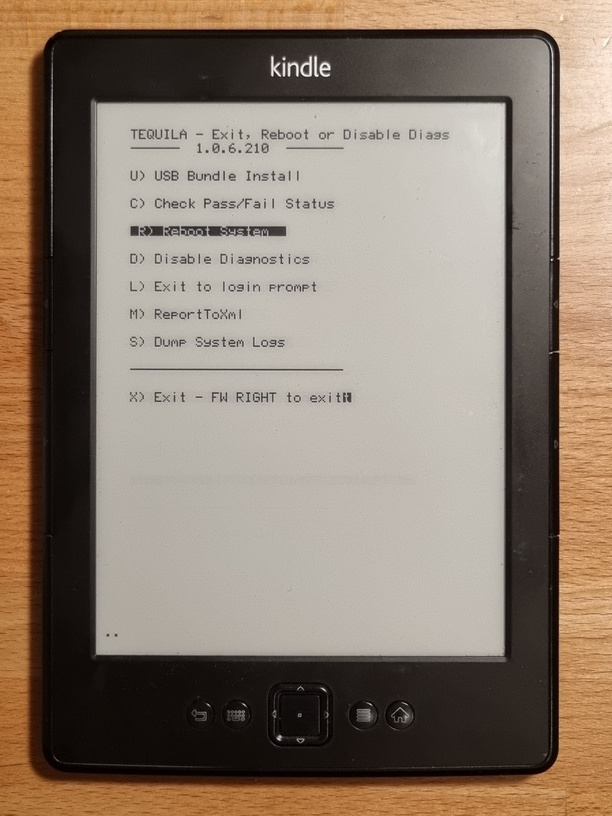
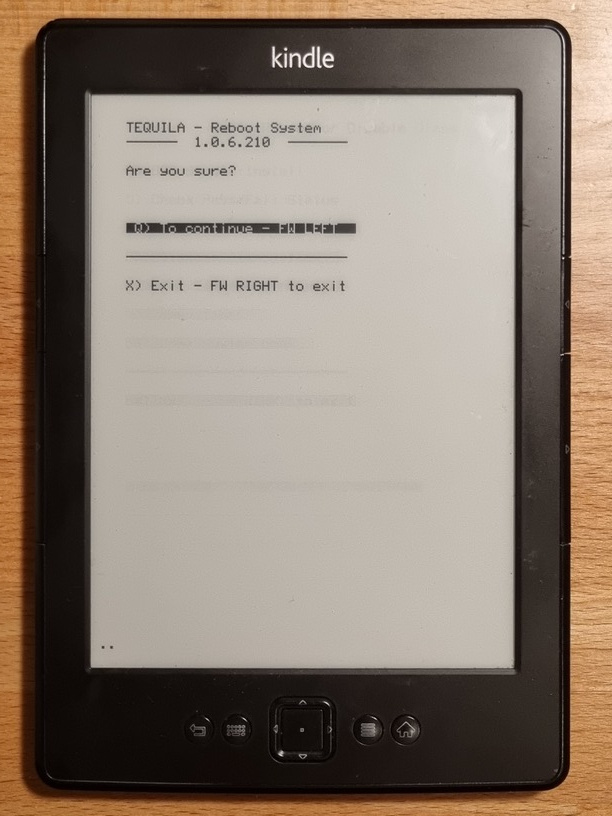
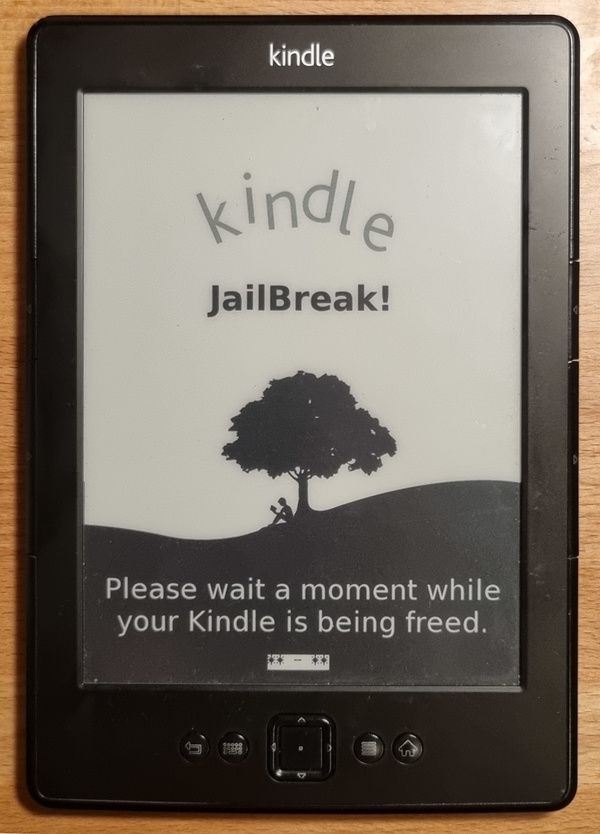
After a while, the Kindle should reboot and return you to the standard home screen.
Installing signing keys
To actually run anything, you’ll first need to install some signing certificates.
If you let your Kindle contact Amazon’s telemetry servers, it will delete the signing key used by KUAL and other unofficial kindlets. So to start with, put your Kindle into airplane mode (we’ll remedy this later).
Back on NiLuJe’s big thread, download “Mobileread Kindlet Kit” (kindle-mkk-20141129-r18833.tar.xz) and install Update_mkk-20141129-k4-ALL_install.bin as a firmware update. Then download DevCerts-20250419-KeyStore.zip from an annoyingly hidden post and install Update_mkk-20250419-k4-ALL_keystore-install.bin the same way.
Installing KUAL
Now let’s install something to launch, just a generic launcher for community software for now.
Download KUAL from another thread and place KUAL-KDK-1.0.azw2 into your Kindle’s documents folder. A new kindlet titled “KUAL” should appear. Launch it to start KUAL.
Re-enabling networking
To ensure the signing certificate stays installed, we redirect all requests to Amazon domains to the local device, effectively breaking them.
Download the block script by LunarEclipse and place the archive contents in <kindle root>/extensions/block_amazon. In KUAL, select “Block Amazon Servers”, then “Block”. The Kindle will reboot and you should be able to now turn on WiFi and still use KUAL.
If you already have SSH access, you can check if the script worked by looking at /etc/hosts.
Installing KOReader
Download the latest version of KOReader from GitHub releases, pick the kindle variant. It will be a .zip file with a koreader and extensions directory inside. Copy those to your Kindle’s root.
The first one contains KOReader proper – binaries, Lua code, and configs. The other contains configs and scripts for KUAL to launch KOReader.
Now you can finally start KOReader! From the homescreen first open KUAL, then the KOReader submenu. I recommend using the “no framework” option, since that kills the original Kindle software, which would otherwise needlessly run in the background.
Optional: Installing USBNetwork
KOReader has its own built-in SSH server and you can connect to WiFi through the original Kindle UI, but the most reliable way to get shell access to the Kindle I’ve found is the USBNetwork mod.
Go to NiLuJe’s big thread, download “Update_mkk-20250419-k4-ALL_keystore-install.bin” (kindle-usbnetwork-0.57.N-r18979.tar.xz) and install Update_usbnetwork_0.57.N_k4_install.bin from it as a firmware update.
After installation, a new directory will appear on the Kindle, usbnet. It’s mainly configured through usbnet/etc/config. To use it, disconnect the Kindle from USB, turn on USBNet through KUAL, then connect it back up. A new USB network interface will appear. Set your computer’s side to IP address 192.168.15.201/24, the Kindle will accept SSH connections on 192.168.15.244; log in as root.
An empty password should suffice for logging in when using dropbear. Otherwise you can try this password generator. You can also change the password with the usual passwd, but only after remounting / read-write.
To set up pubkey auth, you’ll need to copy it to /mnt/us/usbnet/etc/authorized_keys instead of the usual ~/.ssh/authorized_keys.
Which is actually necessary for a device from 2011 and a jailbreak released not too long after.↩︎